Interior Design

Bringing Materials from Bali into the Interior Spaces We Design

BY
DreamR Design Team
|
November 4, 2026
|
 min. read

Conversations about interiors tend to begin with what the eye can take in. The tone of a wall, the grain of a floor, the way afternoon light settles on a surface. These details matter, and they are what a room is remembered for.

Yet a finish is only as good as what lies beneath it. When you renovate a space, the quality of its materials is the foundation the whole design rests on. It shapes how the space feels in its first week, and how it ages across the years that follow.

That thinking guides every decision at DreamR. A material should look right and be right, for the air you breathe and the surfaces you live with each day. Holding both to the same standard is what led us to Bali.

SOURCING INTERIOR DESIGN MATERIALS WITH A DISCERNING EYE

DreamR's founders, Race Wong and Rhonda Wong, set out to find quality materials that were as safe to live with as they were beautiful to look at. Their search took them to different suppliers and workshops over several trips. Samples were set side by side, their composition and finish considered alongside how each material would age in a lived-in space.

Many came close. Few felt right.

The search eventually brought them to a supplier in Bali whose materials met their stringent requirements.

Beyond the finish, it was the thinking behind the work that settled the decision. The supplier is a Bali-based social enterprise, and it holds a belief we share: building responsibly starts with the materials we choose and the people who craft them. 

We found that thinking reflected in the materials themselves. The range is developed around a commitment to toxin-free finishes, upcycled ingredients and lower-carbon alternatives. Upcycled glass and plant fibres replace sand, giving waste materials another use, while lime, clay and locally abundant minerals reduce or replace cement to lower embodied energy. We consider that composition alongside the quality of the finished surface when selecting materials for our clients’ interiors.

DreamR’s founders made several trips back to the supplier’s workshop in Bali, following the making process and examining the finished work for consistency. Seeing that standard of workmanship alongside the care taken with material health and environmental impact gave them the confidence to specify the finishes for our clients’ spaces.

THE MATERIALS WE SOURCE FROM BALI

Interiors ask different things of different surfaces, and our Bali-sourced materials are chosen to meet them, from the floor underfoot to the walls around you. 

The microcement we work with combines minerals, upcycled aggregates and natural fibres in a formulation developed for tropical humidity. Its breathable composition helps resist moisture build-up, while its hand-applied layers create a continuous surface with texture and tone tailored on site. This gives us room to carry a finish across floors, adjusting its character to sit comfortably alongside the other materials in the interior.

We also work with a lime-based, breathable plaster suited to living areas and feature walls. It allows moisture vapour to pass through naturally, helping manage moisture within the surface. Applied by hand in layered passes, it develops a soft texture with delicate shadows that shift with the light. Each wall carries subtle differences shaped by the applicator’s technique, giving the interior a tactile, individual character.

The materials we source extend to the quieter details of an interior, including the zero-VOC, formaldehyde-free adhesive. It disappears as the work takes shape but receives the same care in its selection. What holds a surface in place deserves as much consideration as the surface itself.

Choosing materials well takes time: looking closely, asking questions and understanding the finished work. DreamR is willing to take that time, so clients do not have to carry the uncertainty through their own renovation.

HOW BALI-SOURCED MATERIALS COME TOGETHER IN OUR CLIENTS' SPACES

Today, these materials are part of the interiors we design. We consider their ingredients and making alongside the colour, texture and performance each space requires.

At our recent Midtown Modern project, we used microcement alongside lime plaster. The microcement gave the floors continuity, while the plaster brought a soft, mineral texture to the walls. They were paired with DreamR’s own wall panels, setting the panels’ smoother surfaces against the gentle variation of the plaster. Together, the finishes gave the home a calm, layered character. 

The aim was to carry the panelling through much of the home without adding unnecessary depth to the walls. At approximately 8 to 10 mm thick, our panels allowed us to use panelling extensively while keeping its profile discreet.

The same consideration continued beneath the surface, with the zero-VOC adhesive holding the panels in place. At handover, there was no lingering renovation smell, and the owners could move in immediately.

Ease of this kind is arranged well in advance. Before a material is specified, the DreamR team considers how it is made, how it is expected to age and what its application requires. That groundwork gives clients a clearer basis for choosing the finishes they will live or work with.

DESIGN YOUR SPACE WITH MATERIALS PERSONALLY SOURCED AND THOUGHTFULLY APPLIED

Knowing what goes into your space is part of designing it. Where the materials come from, how they are made and how they suit daily use are all worth a conversation. 

Whether you are planning a landed home renovation, rethinking your condominium’s interior design, undertaking an office renovation or developing a commercial interior, we select each material with intent and talk you through what will be used in your space, so every decision is made with confidence.

Book a private consultation today and discover how we can shape your space with materials chosen for lasting quality, comfort and character. 

‍

FREQUENTLY ASKED QUESTIONS

ARE THE MATERIALS DREAMR USES SUITED TO A HUMID CLIMATE LIKE SINGAPORE?

Yes, DreamR selects materials suited to Singapore’s humid climate and their intended use. For example, our microcement is formulated for high-humidity environments, while our lime plaster allows moisture vapour to pass through the finish. We also assess the underlying surface, moisture exposure and installation requirements, particularly in wet areas.

CAN I VIEW MATERIAL SAMPLES BEFORE MAKING A DECISION?

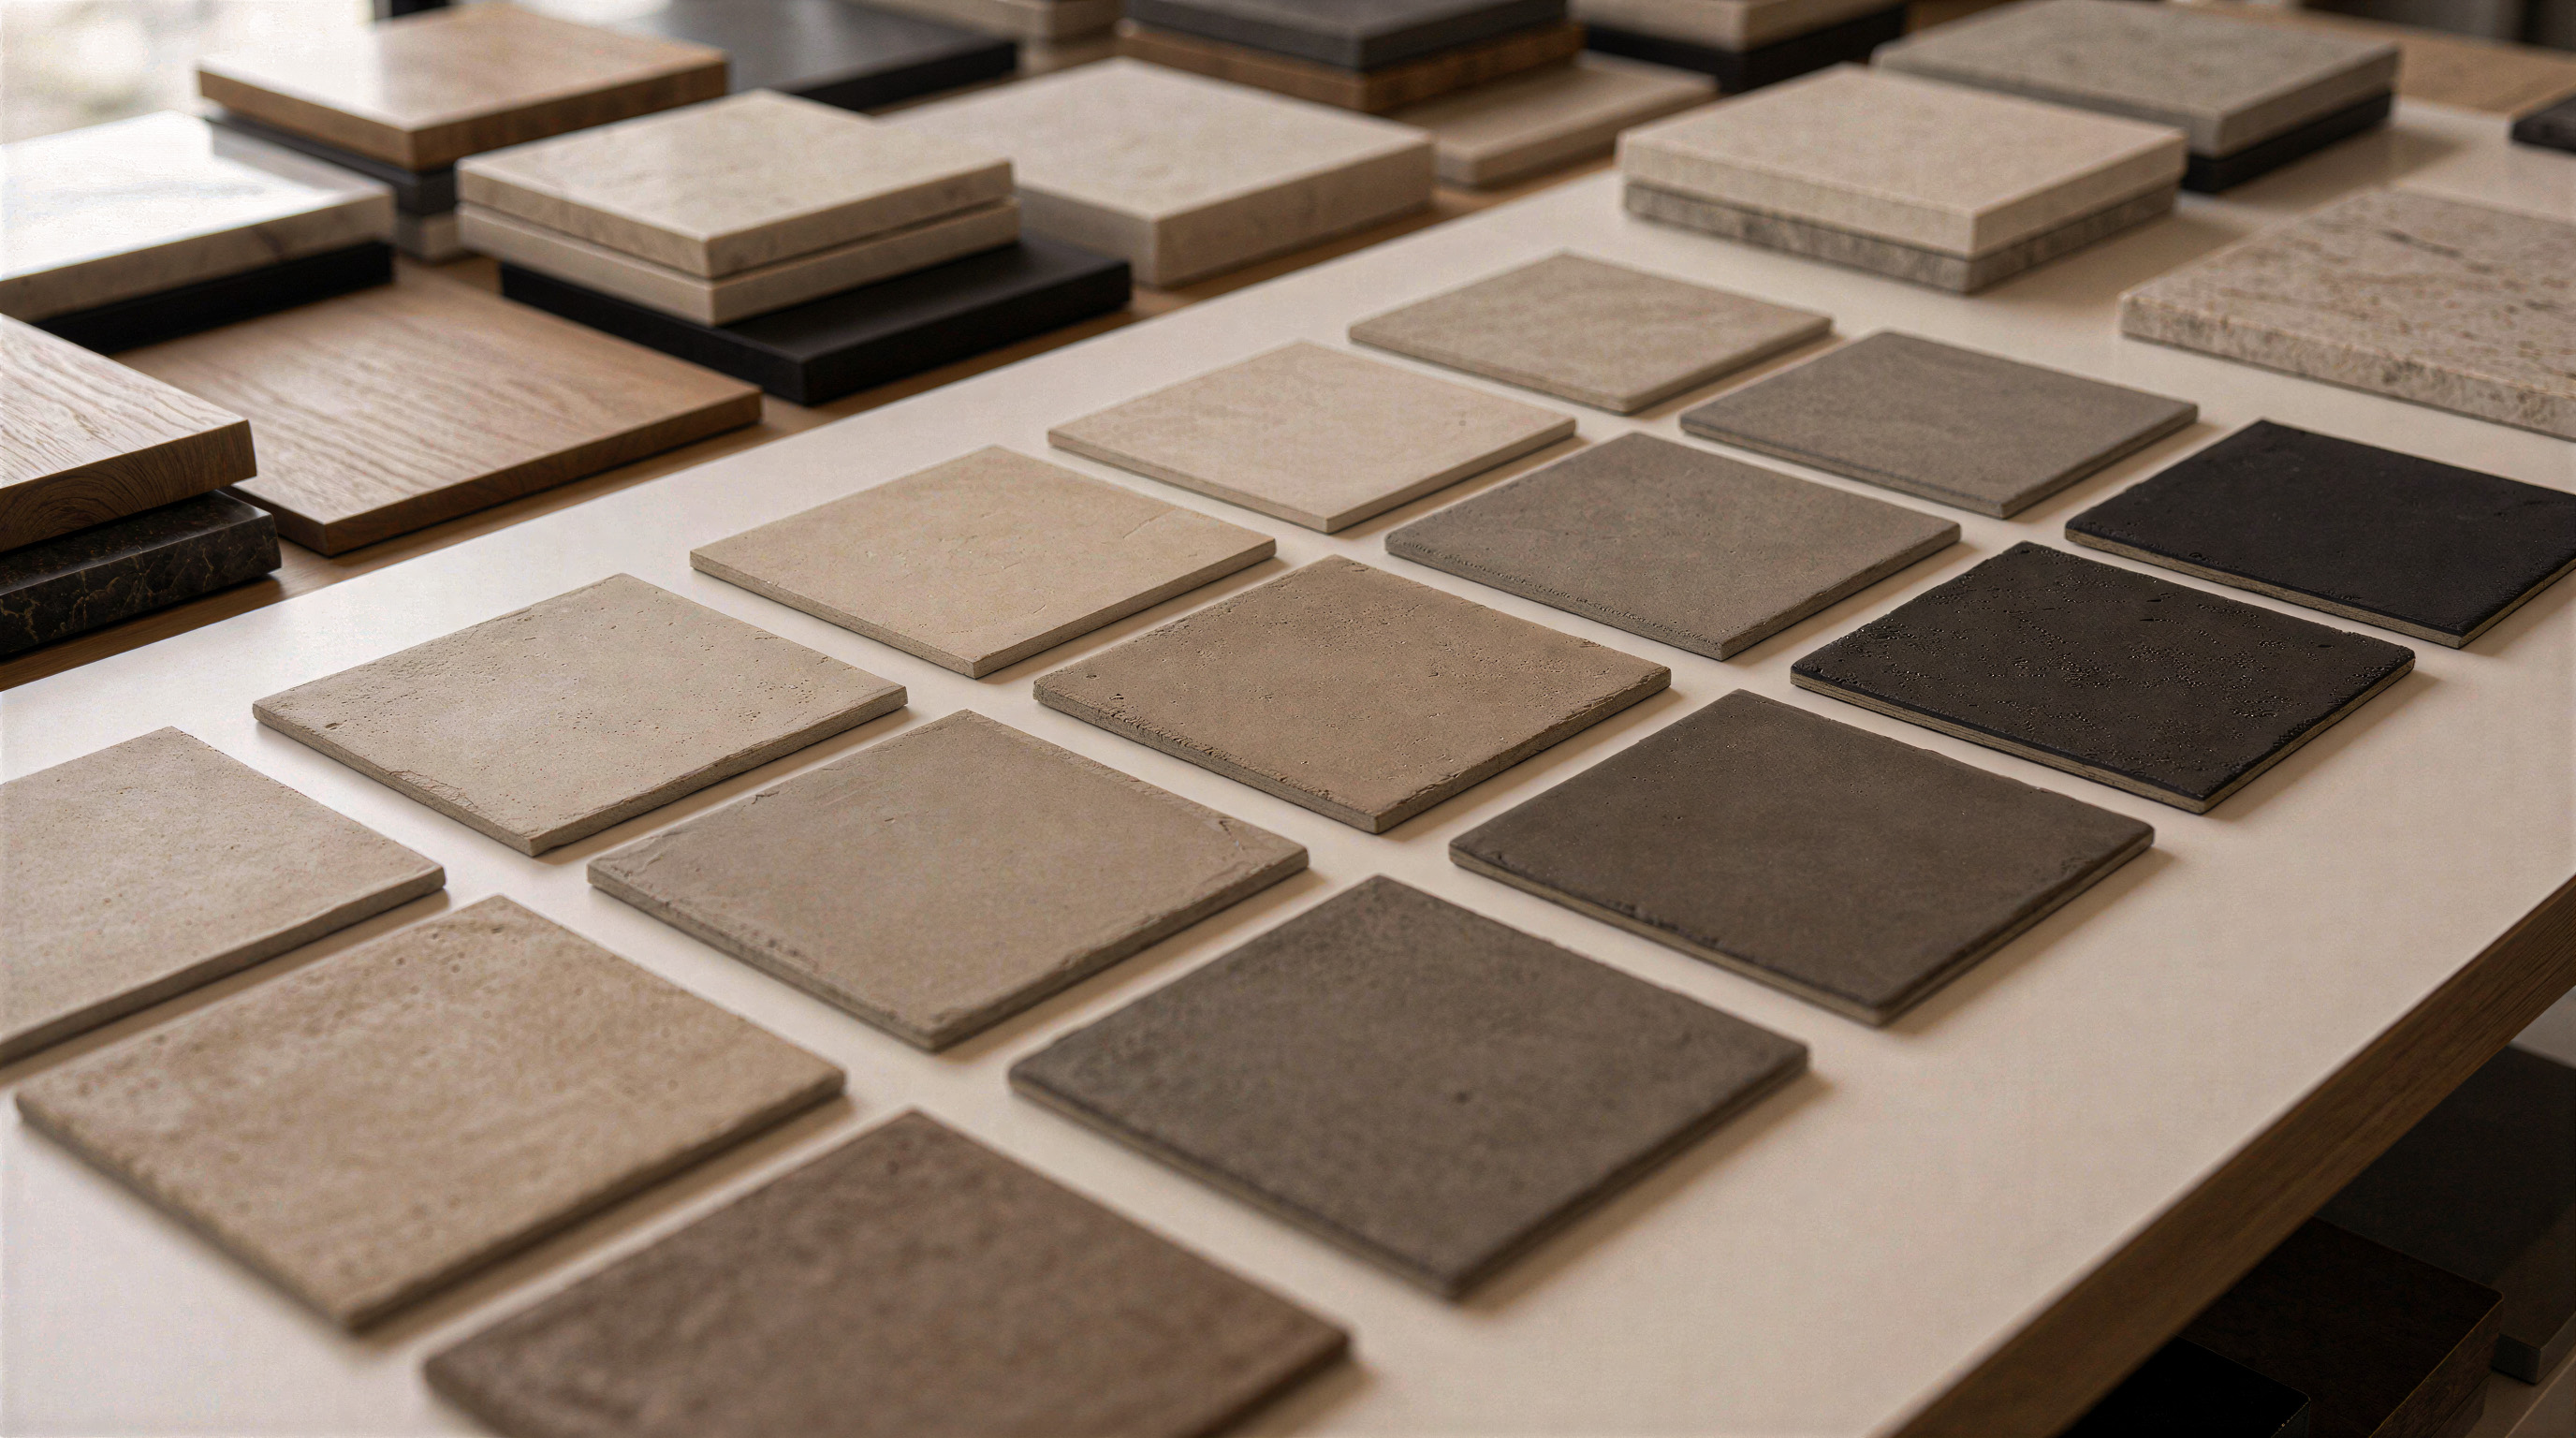
Yes, you can review material samples with the DreamR team before selecting your finishes. Comparing samples together helps you see how their colours and textures relate. DreamR also discusses where each material will be used, how it contributes to the design and any care requirements to consider.

WILL THE FINISHED SURFACE LOOK EXACTLY LIKE THE SAMPLE?

Hand-applied finishes can show variations in tone and texture, so the completed surface may not exactly replicate a small sample. The sample establishes the intended direction. Before approval, discuss the degree of variation to expect and whether a larger sample or on-site mock-up would help clarify the result.

HOW DO I MAINTAIN THE MATERIALS USED IN MY INTERIOR?

Maintenance needs depend on the material and its protective finish. Ask which cleaning products to use and whether the surface needs periodic resealing or other upkeep. Your designer should provide maintenance guidance specific to the materials installed in your space.

Share
Link copied!
Tags
Interior Design

Insights from the DreamR Team

EXPLORE all blog
November 4, 2026
min. read

Conversations about interiors tend to begin with what the eye can take in. The tone of a wall, the grain of a floor, the way afternoon light settles on a surface. These details matter, and they are what a room is remembered for.

Yet a finish is only as good as what lies beneath it. When you renovate a space, the quality of its materials is the foundation the whole design rests on. It shapes how the space feels in its first week, and how it ages across the years that follow.

That thinking guides every decision at DreamR. A material should look right and be right, for the air you breathe and the surfaces you live with each day. Holding both to the same standard is what led us to Bali.

SOURCING INTERIOR DESIGN MATERIALS WITH A DISCERNING EYE

DreamR's founders, Race Wong and Rhonda Wong, set out to find quality materials that were as safe to live with as they were beautiful to look at. Their search took them to different suppliers and workshops over several trips. Samples were set side by side, their composition and finish considered alongside how each material would age in a lived-in space.

Many came close. Few felt right.

The search eventually brought them to a supplier in Bali whose materials met their stringent requirements.

Beyond the finish, it was the thinking behind the work that settled the decision. The supplier is a Bali-based social enterprise, and it holds a belief we share: building responsibly starts with the materials we choose and the people who craft them. 

We found that thinking reflected in the materials themselves. The range is developed around a commitment to toxin-free finishes, upcycled ingredients and lower-carbon alternatives. Upcycled glass and plant fibres replace sand, giving waste materials another use, while lime, clay and locally abundant minerals reduce or replace cement to lower embodied energy. We consider that composition alongside the quality of the finished surface when selecting materials for our clients’ interiors.

DreamR’s founders made several trips back to the supplier’s workshop in Bali, following the making process and examining the finished work for consistency. Seeing that standard of workmanship alongside the care taken with material health and environmental impact gave them the confidence to specify the finishes for our clients’ spaces.

THE MATERIALS WE SOURCE FROM BALI

Interiors ask different things of different surfaces, and our Bali-sourced materials are chosen to meet them, from the floor underfoot to the walls around you. 

The microcement we work with combines minerals, upcycled aggregates and natural fibres in a formulation developed for tropical humidity. Its breathable composition helps resist moisture build-up, while its hand-applied layers create a continuous surface with texture and tone tailored on site. This gives us room to carry a finish across floors, adjusting its character to sit comfortably alongside the other materials in the interior.

We also work with a lime-based, breathable plaster suited to living areas and feature walls. It allows moisture vapour to pass through naturally, helping manage moisture within the surface. Applied by hand in layered passes, it develops a soft texture with delicate shadows that shift with the light. Each wall carries subtle differences shaped by the applicator’s technique, giving the interior a tactile, individual character.

The materials we source extend to the quieter details of an interior, including the zero-VOC, formaldehyde-free adhesive. It disappears as the work takes shape but receives the same care in its selection. What holds a surface in place deserves as much consideration as the surface itself.

Choosing materials well takes time: looking closely, asking questions and understanding the finished work. DreamR is willing to take that time, so clients do not have to carry the uncertainty through their own renovation.

HOW BALI-SOURCED MATERIALS COME TOGETHER IN OUR CLIENTS' SPACES

Today, these materials are part of the interiors we design. We consider their ingredients and making alongside the colour, texture and performance each space requires.

At our recent Midtown Modern project, we used microcement alongside lime plaster. The microcement gave the floors continuity, while the plaster brought a soft, mineral texture to the walls. They were paired with DreamR’s own wall panels, setting the panels’ smoother surfaces against the gentle variation of the plaster. Together, the finishes gave the home a calm, layered character. 

The aim was to carry the panelling through much of the home without adding unnecessary depth to the walls. At approximately 8 to 10 mm thick, our panels allowed us to use panelling extensively while keeping its profile discreet.

The same consideration continued beneath the surface, with the zero-VOC adhesive holding the panels in place. At handover, there was no lingering renovation smell, and the owners could move in immediately.

Ease of this kind is arranged well in advance. Before a material is specified, the DreamR team considers how it is made, how it is expected to age and what its application requires. That groundwork gives clients a clearer basis for choosing the finishes they will live or work with.

DESIGN YOUR SPACE WITH MATERIALS PERSONALLY SOURCED AND THOUGHTFULLY APPLIED

Knowing what goes into your space is part of designing it. Where the materials come from, how they are made and how they suit daily use are all worth a conversation. 

Whether you are planning a landed home renovation, rethinking your condominium’s interior design, undertaking an office renovation or developing a commercial interior, we select each material with intent and talk you through what will be used in your space, so every decision is made with confidence.

Book a private consultation today and discover how we can shape your space with materials chosen for lasting quality, comfort and character. 

‍

FREQUENTLY ASKED QUESTIONS

ARE THE MATERIALS DREAMR USES SUITED TO A HUMID CLIMATE LIKE SINGAPORE?

Yes, DreamR selects materials suited to Singapore’s humid climate and their intended use. For example, our microcement is formulated for high-humidity environments, while our lime plaster allows moisture vapour to pass through the finish. We also assess the underlying surface, moisture exposure and installation requirements, particularly in wet areas.

CAN I VIEW MATERIAL SAMPLES BEFORE MAKING A DECISION?

Yes, you can review material samples with the DreamR team before selecting your finishes. Comparing samples together helps you see how their colours and textures relate. DreamR also discusses where each material will be used, how it contributes to the design and any care requirements to consider.

WILL THE FINISHED SURFACE LOOK EXACTLY LIKE THE SAMPLE?

Hand-applied finishes can show variations in tone and texture, so the completed surface may not exactly replicate a small sample. The sample establishes the intended direction. Before approval, discuss the degree of variation to expect and whether a larger sample or on-site mock-up would help clarify the result.

HOW DO I MAINTAIN THE MATERIALS USED IN MY INTERIOR?

Maintenance needs depend on the material and its protective finish. Ask which cleaning products to use and whether the surface needs periodic resealing or other upkeep. Your designer should provide maintenance guidance specific to the materials installed in your space.

Bringing Materials from Bali into the Interior Spaces We Design

October 30, 2026
min. read

A wall is rarely experienced on its own. There is the floor beneath it, the furniture drawn up beside it and the light that reaches it at different hours. In a home, a material becomes part of all these relationships.

Microcement has a particular presence within an interior. Its continuous surface can connect one part of a room to another, while subtle variations in the finish give the eye something to return to. The effect depends on the colour, the texture, the light and the materials that share the space.

If you are planning a renovation and considering microcement for your home’s interior, the right finish will depend on what you want to change. Would you like to give a familiar room a cleaner, more contemporary look? Or bring a greater sense of continuity to the space?

These questions guide how the DreamR team designs a home with microcement, from the first sample to the finished surface.

BRINGING MICROCEMENT INTO AN INTERIOR

The character of a microcement finish depends in part on the materials around it. Metal can give its softly varied surface a more defined edge, while natural stone can introduce a different pattern and depth. The balance begins with the kind of interior the homeowner wants to create.

For the owners of a Good Class Bungalow we renovated, the wish was for a more contemporary home that still retained the material quality and craftsmanship they valued. We brought microcement together with metal accents and natural marble: the microcement gave the interior a pared-back foundation, while the metal and stone introduced definition and richness.

In the children’s bathroom, this approach creates an intimate, restful space. Warm-toned microcement wraps around the freestanding bath, giving the walls continuity and subtle variation. The bath’s smooth white form stands out against it, while the glass partition keeps the finish visible through the shower area. Together, they give the room a contemporary character without losing its warmth.

Your home may call for a different balance. There may be a material you want to keep, or a room you would like to feel less formal. We look at where microcement could be used and how it would sit alongside the other finishes, so the combination supports what you want the space to become.

CHOOSING A MICROCEMENT COLOUR FOR YOUR INTERIOR

Microcement can be made in shades ranging from sand and beige to grey. The colour is selected with the room’s other materials in mind, since they can change how its undertones appear.

A warm grey beside oak may take on an almost beige cast. The same grey beside a pale stone may appear cooler. The microcement itself has not changed, but the material beside it can make different undertones more noticeable.

The material bar at the House gives us a place to work through those relationships with you. We lay out the finishes proposed for your home and compare microcement shades alongside them. You can handle the samples, see them together and notice how a change in shade affects the palette. One grey may draw out the warmth of a timber; another may give a stone’s colour or veining greater definition.

From there, we can discuss which combination feels closest to what you have in mind and explain the reasoning behind our recommendation. The final choice also depends on the proportions of the room: a small sample may feel subtle on the table, but microcement across an entire wall will have a greater presence. We return to the design before settling on the shade, so you can understand how it will contribute to the finished interior.

SEEING MICROCEMENT UNDER DIFFERENT LIGHTING

Light changes the appearance of microcement. A grey that feels warm in daylight may appear cooler under another lighting setting; light directed along a wall can also reveal more of its surface texture.

At the House, the material bar is designed to make those differences visible. Its adjustable lighting temperatures allow us to view the same finish under warmer and cooler light, alongside the other materials proposed for your home. A shade that feels balanced under one setting may reveal an unexpected undertone under another.

During one material selection, a homeowner wanted their living room to feel warmer and more inviting, as the existing interior had long felt too cool. A grey microcement sample sat comfortably beside the chosen timber and stone under warm light, but took on a blue-grey cast under a cooler setting. We compared it with a softer grey with a hint of beige, which held more of the warmth the homeowner wanted. That second shade became the basis for the room’s palette.

Changing the lighting temperature allows you to see those shifts for yourself before the finish is selected. We can then discuss them in relation to the daylight your room receives and the lighting planned for it, so the shade is chosen with the conditions of your home in mind.

HOW MUCH MICROCEMENT TEXTURE DO YOU WANT TO SEE?

Microcement can feel smooth to the touch while showing variation across its surface. Some finishes have gentle shifts in tone; others retain more visible marks from the application.

On a small sample, that movement may be barely perceptible. Across a full wall, it becomes part of the room’s character. A more expressive finish gives the surface greater presence. A quieter one may allow a piece of stone, the shape of a bath or another feature to take the lead.

We look at samples with you up close and from a distance, considering the area the finish will cover and the light that will fall across it. Where microcement is proposed for a bathroom, the selected system and protective finish also need to be appropriate for its location. The visual decision belongs alongside an understanding of how the surface will be used and cared for.

A MICROCEMENT FINISH MADE FOR YOUR HOME

Colour, texture and light may be considered separately during the design process. In the finished room, they are experienced together: the shade beside the materials you chose, the surface seen in daylight and the variations revealed when the lights come on in the evening.

Whether you are renovating a landed home or reimagining your condominium’s interior design, we would love to explore how microcement could become part of the space you have in mind.

Book a private consultation with DreamR.

FREQUENTLY ASKED QUESTIONS

DOES MICROCEMENT CRACK EASILY?

Microcement can be resistant to cracking when properly applied, but cracks may develop if the surface beneath it moves or is improperly prepared. The condition of the existing surface and the installation method both matter. Before application, the installer should assess the substrate and address any cracks or movement so they are less likely to affect the finish.

HOW LONG DOES MICROCEMENT LAST?

Microcement can last for many years when it is properly applied, protected and maintained. Its lifespan depends on the product, the surface beneath it, how the space is used and how well the protective finish is cared for. Your installer can advise when the surface may need attention or its protective coating may need refreshing.

IS MICROCEMENT HIGH MAINTENANCE?

Microcement is generally straightforward to maintain, but it still needs regular cleaning and care. Use cleaning products recommended for the selected finish, and avoid abrasive or acidic cleaners that could damage it. Over time, the protective coating may need to be renewed, depending on the product, the location and how much wear the surface receives.

IS MICROCEMENT REALLY WATERPROOF?

Microcement’s water resistance depends on the specific system and how it is installed and protected. Some products require a suitable sealer, while others are formulated to be waterproof before sealing. In showers and other wet areas, the complete specification, including any required waterproofing beneath the finish, should be confirmed with the manufacturer and installer.

IS MICROCEMENT GOOD FOR BATHROOMS?

Yes, microcement can be used in bathrooms when the selected system is suitable for the intended surface and water exposure. Walls, floors and shower areas may have different requirements for waterproofing, protection and slip resistance. These details should be agreed during design so the finished surface is appropriate for how the bathroom will be used.

‍

Designing a Home with Microcement: Colour, Texture and Light

October 19, 2026
min. read

The owners of a 15-year-old Good Class Bungalow in Singapore wanted to move beyond the home’s conventional design while preserving the quality of materials and craftsmanship they valued. That was the brief for our renovation of this family home.

In the children’s room, our custom fabrication work took a playful turn. The idea was a barn-inspired enclosure, somewhere for bedtime and the hours before it. 

Its making began with a question: how could we preserve that sense of play while attending to the children’s safety and the everyday needs of a bedroom?

A BARN-INSPIRED BEDROOM THE CHILDREN COULD MAKE THEIR OWN

The family wanted that departure from conventional design to take a playful form in the children’s bedroom. Alongside comfortable beds and storage, they imagined a window to peek through, a slide to enjoy and somewhere to disappear into a game for an afternoon.

A barn-inspired enclosure gave those wishes a form we could work with. White vertical panelling and a sliding shutter with diagonal detailing would give it the familiar character of a barn. A small framed window would look out into the bedroom, while an arched opening would frame the slide, with timber-toned surrounds bringing the openings together. Inside, sleeping spaces would sit on two levels, with shelves beside the beds.

The challenge was to consider how the children would move through the enclosure, from taking the steps to the upper bed to sitting at the top of the slide. We needed to allow space for each movement while considering gaps around openings and how the shutter and drawers would operate.

We approached the custom fabrication from the inside out, considering the space for sleeping, storage and movement together with the safety details. Those decisions would shape the barn around them.

MAKING ROOM AT BOTH BED LEVELS

We needed to establish how much space each mattress would occupy and leave enough headroom for the children to sit upright without hitting the structure above.

To work this out, we drew a section through both sleeping levels, showing the mattresses, bed bases and supporting frame together. This allowed us to account for the thickness of the construction when setting the beds at their respective heights.

Once those heights were settled, we could work out the steps and where they would meet the upper sleeping area.

The shelves inside needed similar attention. They had to hold books and personal objects while leaving enough room beside the mattress. We considered their depth and position together, so their contents would be within reach from the bed.

STEPS WITH DRAWERS BUILT INTO THEM

As we developed the steps leading to the upper bed, we considered how the space beneath them could hold storage. The idea was to fit drawers into the staircase, giving the children somewhere to keep their belongings within the same structure.

The height and depth of each step informed the size of the drawers. We sized the drawer boxes to fit within the supporting frame, allowing space for their runners while retaining the support beneath each step. The position of the handhold beside the steps mattered too: it needed to stay within the children’s reach as they went up and down.

Before finalising the drawer depths, we checked how far they would extend into the bedroom and whether they would obstruct the approach to the steps. We then aligned the fronts with the faces of the staircase, so the drawers would sit flush when closed.

A SLIDE GIVES THEM ANOTHER WAY DOWN

The steps take the children up. The slide gives them another way down, making the journey between the sleeping nook and the bedroom part of the play.

The slide had to be considered with the enclosure from the beginning. We checked its suitability for the children’s ages and the height of the upper level, then set out the entrance with room for them to sit before sliding down. The opening and surrounding panels were shaped around that space.

Its length and slope determined how far the slide would extend into the bedroom. We positioned the slide so it would end away from furniture and the main route through the room, leaving a clear area at its base.

At the upper level, we detailed how the slide would attach to the supporting structure and how the arched surround would meet it. We specified smooth, rounded edges on the adjoining panels and worked through the gaps between components to address places where fingers or clothing could become caught.

A SLIDING SHUTTER SHOULD FEEL SIMPLE

The barn’s shutter moves across the white panelled frontage on an exposed track. Its diagonal detailing recalls a barn door. Its movement depends on less visible decisions.

We worked through how the children would open and close the shutter and the space it needed to travel. Its weight informed the choice of track and hanging hardware. The guides would keep the panel aligned, while the stops would limit its travel. We also reviewed the closing edges and gaps around the frame, where small fingers might reach.

WHAT THE CUSTOM FABRICATION MADE POSSIBLE

Before handover, we checked the enclosure as a finished whole. The drawers and shutter moved smoothly, the handhold was secure and the slide’s entrance and exit were clear. The details developed in the drawings now worked together in the room.

Within the larger family home, the children now had a small world of their own. Somewhere to settle quietly or let an afternoon’s game carry on a little longer. A bedroom with reasons to return long before bedtime.

In this room, the family’s wish to move beyond conventional design found its answer: a space that keeps the quality they value and leaves plenty of room for play.

If you’d like to see more of the spaces we’ve worked on, you can browse our project portfolio.

LET’S TALK ABOUT THE HOME YOU HAVE IN MIND

Whether you are renovating a landed home or a condominium, there may be an idea you keep returning to. Something you would like made a certain way, for a reason particular to how you live.

We would be pleased to hear about it, alongside your plans for the home. From there, we can consider what it would take to make it, with attention to the proportions, materials and details that matter to you.

Book a private consultation with DreamR to share your plans and explore the possibilities for your home.

FREQUENTLY ASKED QUESTIONS

WHAT SHOULD I BRING TO A CONSULTATION ABOUT CUSTOM FABRICATION?

Bring your floor plan and any specific requirements for what you would like made. Dimensions of items it needs to accommodate, such as mattresses, books or equipment, are useful starting points. Share what works in your current home and what you would like to use differently.

HOW ARE MATERIALS CHOSEN FOR CUSTOM-BUILT ELEMENTS?

Material choices depend on what each part needs to do. A supporting frame, a drawer box and a visible panel may require different materials or thicknesses. Weight, stability, finish and maintenance should be considered alongside appearance, with samples and specifications agreed before fabrication.

CAN CUSTOM-BUILT ELEMENTS BE ADAPTED AS CHILDREN GROW?

Some changes can be allowed for from the outset, such as adjustable shelving or removable fittings. Larger alterations depend on how the structure is built. If you envisage removing a slide or changing a sleeping area later, discuss this during design so those possibilities can inform the connections and construction.

Custom Fabrication That Makes Room for Play in a Family Home

October 16, 2026
min. read

Here is a pattern almost everyone in Singapore follows without noticing. Years of decisions, negotiation and nerve go into acquiring the property. Then the interior, the part you will actually live inside, every morning and every night, for the next ten years, is settled in a few weekend afternoons, chosen quickly, priced per square foot, and gotten through.

We have it backwards.

You do not live in the address. You live in the rooms. You spend far more waking life inside your home than at any restaurant you would book weeks ahead, any hotel you would research for hours. And yet the home, the setting for nearly all of it, is the thing we are trained to buy fastest and think about least.

The correction is not extravagance. It is proportion. If a home is where most of your life happens, then a meaningful share of what you put into the property belongs to the life lived inside it. Not a token. Not whatever is left after the purchase, but a real proportion of the whole. Enough that the rooms are equal to the years you will spend in them. 

That is the entire argument the House is built to make. It is why we did not build a showroom, where the interior is priced and gotten through. We built a place you would actually want to spend a Sunday. Because until you feel how much of a life is lived indoors, no one can tell you what the indoors is worth.

Stand in it once, and the maths changes.

Book a private consultation.

‍

You Spent Everything on the Address

EXPLORE all blog

CURIOUS WHAT WE CAN DO
FOR YOUR SPACE?

Send us a message, and we'll be happy to
walk you through it.
START YOUR PROJECT
Renovation starts at $300,000

Start your bespoke renovation journey

Consult with us, for free,
to experience:
Specialised in-house team
Transparent pricing
Health and Safety
On-time delivery

Facebook

Instagram

Required fields are marked with an asterisk (*)
Renovation starts from $300,000

Message sent!

We’ll circle back to you, meanwhile just sit and dream of your future space.
Oops! Submission encountered a hiccup. Please try again.
or
Chat on Whatsapp

Facebook

Instagram